Post Op Dental Reccomendations
Please click on the below link to review the instructions following your specific dental treatment
INSTRUCTIONS
Do Not Disturb the Wound In doing so you may invite irritation, infection and/or bleeding. Be sure to chew on the opposite side for 24 hours and keep anything sharp from entering the wound (i.e. eating utensils etc. ).
Mouth Wash Avoid all rinsing for 24 hours after extraction. This is to insure the formation of a healing blood clot which is essential to proper wound healing. Disturbance of this clot can lead to increased bleeding. You may use warm salt water or mild antiseptic rinses after 24 hours only if prescribed.
 Excessive Bleeding: When you leave the office, you will be given verbal instructions regarding the control of postoperative bleeding. A rolled up gauze pad will be placed on the extraction site and you will be asked to change this dressing every 20 minutes or so depending on the amount of bleeding that is occurring. We will also give you a package of gauze to take with you to use at home if the bleeding should continue. Should you need to use the gauze at home, remember to roll it into a ball large enough to cover the wound. Hold firmly in place, with finger pressure, for about 20-30 minutes. If bleeding still continues, you may fold a tea bag in half and bite down on it. Tea contains Tannic Acid , a styptic, which may help to reduce the bleeding. If bleeding still continues, call for further instructions.
Pain : Analgesic tablets ( i.e. Aspirin, Tylenol etc. ) may be taken under my direction. Prescription medication, which may have been given to you, should also be taken as directed. If pain continues, please give us a call.
Swelling : To prevent swelling, apply ice or a cold towel to the outside of your face in the area of the extraction . Apply alternately, 20 minutes on then 20 minutes off, for an hour or longer if necessary.
What Is It and Why Do I Need It?
 Today we may have suggested to you that Root Canal Therapy ( otherwise known as Endodontics) was needed for a particular tooth. We may have briefly discussed some of the facts concerning the procedures involved in root canal therapy but perhaps you would like some more information.
A badly infected tooth, or one that just had significant decay, was doomed to be extracted. Today the majority of these teeth can be salvaged through a procedures utilized by both the General Dentist and the root canal specialist, the Endodontist.
Extraction is truly our last resort!
1. The removal of the infected or irritated nerve tissue (Fig.2) that lies within the root of the tooth. It is this infected pulp tissue that causes an eventual abscess.
2. The first step in a root canal is to obtain access to the nerve. This is accomplished by establishing a small access opening in the top of the tooth. It will be done under a local anesthetic. ( Fig. 3 )
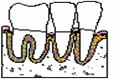
Healed Infection

3. At the same visit, the canal where the nerve is located will be reshaped and prepared to accept a special root canal filling material. This filling procedure will probably not occur until your next visit. The number of visits necessary to complete your root canal will depend upon several factors including the number of nerves in the tooth, the infected state of the nerve and the complexity of the procedure. (Fig. 4)
4. The final step in your root canal will be the sealing of the root canal with a sterile, plastic material, called gutta percha This is done in order to prevent possible future infection.( Fig. 5)
5. The tooth will then possibly need a post and core and a crown in order to re-establish normal form and function. This decision will be based upon several additional factors. (Fig. 6)
If treated early, root canal therapy need not be uncomfortable. With the use of local anesthetics, the entire procedure can be totally painless.
Another ” Old Wive’s Tale ” is that by removing the nerve the tooth becomes ” dead “. This is not true. The tooth is very much alive and functioning because it receives a source of blood supply and nerve supply from the surrounding tissues that hold it in place in your jaw bone. The tooth will have no sense of feeling to hot, cold or sweets but will be responsive to biting pressures etc. With the proper restoration the tooth should last as long as your other teeth and can even be used as an anchor tooth for a partial denture or cemented bridge. The success rates for root canal therapy have been reported to be as high as 95%.
Sometimes when there has been long standing infection or abscess, there may be some soreness associated with the first or second root canal visit. If this should turn out to be true you will be given specific instructions to follow to minimize the discomfort. When an infection is present, it may be necessary to take an antibiotic. If pain should be present, analgesics may need to be prescribed. In either case, be sure to call the office if either of these problems should arise.
POSTOPERATIVE INSTRUCTIONS:
1. Postoperative discomfort is sometimes experienced after a treatment visit. This is due to irritation of the bone surrounding the tooth and may range from a mild discomfort in the area to an occasional episode of considerable pain. This discomfort will usually maximize in approximately 48-72 hours and then subside. Please avoid chewing on the treated tooth for a few days.
2. If a throbbing sensation occurs please keep your head elevated as much as possible and place extra pillows under your head when lying down. Avoid as much as possible any strenuous activity as well.
3. If your tooth has been left open to aid in drainage of an infection, please place cotton in your tooth as directed. Do not leave the cotton in the tooth between meals.
4. If swelling of the gum is present or should appear after a treatment visit, please rinse the area every 1-2 hours with a solution of warm salt water prepared by adding a teaspoon of salt to an 8 oz. glass of warm water.
5. If swelling of the face is present or should appear, apply an ice pack to the area for 5 minutes every 1/2 hour.
6. If antibiotic medication has been prescribed please take it as indicated until you have finished ALL of the medication. If you encounter any difficulty in breathing or a skin rash, or gastric disturbance should occur, please discontinue the medication and call the office.
If medication for pain has been prescribed , please take it as indicated. It is important to bear in mind that narcotic medications such as Codeine, Percodan and Demerol may make you drowsy. Therefore, caution should be exercised in operating any potentially dangerous machinery or an automobile.

you’ve just had a white filling placed. Seemed kind of simple, but there is a lot more to it than may meet the eye. First let me explain a little bit about the various types of white fillings that are currently available.
The most simple form of ‘white filling’ is technically called a Composite. It is made up of a composite quartz resin and usually contains some sort of light sensitive agent. These light cured composites are extremely cosmetic and most often bonded into place. They can be used in both the front of the mouth as well as in the your back teeth. Some of these composite materials have been specifically designed to actually withstand the incredible forces you can exert when chewing on your back teeth.
In order to bond a filling material to your tooth it is first necessary to remove decay, prepare the tooth and then to condition the enamel and dentin. Once conditioned, a thin resin is applied which bonds to the etched surface. The bond strength of these fillings is incredible. Today we can bond plastics and even amalgam (silver fillings) to your teeth. Bonding increases the strength of these restorations far beyond those of only a short time ago.
After placement, composites are hardened by shining a light on them for a specified period of time, usually around 40 seconds. Since we tend to look at this light all the time ( many times a day) it is necessary for us to protect our eyes from it with an orange shield. It is not necessary for us to protect your eyes since you look at this light only once in a while. However, it is probably a good idea for you not to look directly into the light anyway. An ounce of prevention, is indeed, worth a pound of cure!
you probably asking the question, ” When can I eat?”. Well, after placement, as long as you brought your own food and you share, you may chew right away. These fillings are instantly hardened by the light. Your teeth may experience some degree of temperature sensitivity for a few days to a week. If it does not disappear within that period of time, please give the office a call.
The other type of ‘white filling’ is call a Composite or Porcelain Inlay. These fillings are usually placed in back teeth when esthetics is of utmost concern. In order to increase their strength and longevity, they are fabricated in the laboratory and then bonded into position in the office. This is a two visit procedure rather than the one visit required to place a composite filling. However, when it comes to strength and cosmetics, the extra time and expense is well worth it! I hope that you now understand a little bit more about your new white (composite) filling. ,if you have any questions regarding this or any other treatment procedure, please feel free to call at any time.
All About Porcelain Laminates :
Porcelain Laminates are probably the most esthetic means of creating a more pleasing and beautiful smile. They require a minimal amount of tooth reduction ( approximately .5 mm ) and are, therefore, a more conservative restoration than a crown. Porcelain laminates allow us to alter tooth position, shape, size and color. They are not the only alternative for all esthetic abnormalities but are truly a remarkable restoration when they are the treatment of choice.
 Some facts you might want to know about Porcelain Laminates :
Since they require approximately .5mm of tooth reduction, porcelain laminates are NOT considered a reversible form of treatment.
< Occasionally the preparation of a Porcelain Laminate Veneer does not necessitate the use of a local anesthetic. However, for those patients that are particularly sensitive or anxious, a local anesthetic is advisable.
The laboratory time required for the fabrication of a Porcelain Laminate Veneer is approximately one week. Due to the minimal amount of tooth reduction, it is usually not necessary to fabricate any type of temporary restoration. Should a temporary be needed, they can, in most circumstances, be made at the time of treatment.
Between your preparation visit and the insertion visit, you can expect some sensitivity to hot and cold. This is normal and is due to the removal of a small portion of the enamel covering of the tooth. This sensitivity should disappear after the placement of your Porcelain Laminate Veneer.
Your second visit, the insertion of your laminate, can be accomplished, once again , with or without local anesthetic. This visit is usually longer in length. The laminates are placed with a light sensitive resin which is hardened by using a white light.
Once placed your laminates are very strong and will resist most of the forces placed upon them by a normal diet. Porcelain has great crushing strength but poor tensile strength. Therefore, you should avoid anything that will tend to twist the laminate. Opening pistachio nuts with your teeth, chewing on bones or jelly apples is probably not a good idea. As with most things, common sense should prevail.
Maintenance of Your New Porcelain Laminates :
The maintenance of your Porcelain Laminate Veneer is relatively simple. A few suggestions, however, are in order:
1. Some sensitivity to hot and cold may be experienced after the placement of your laminates. This relates to the amount of enamel left on your tooth after preparation, the proximity of the nerve as well as several other factors. Some sensitivity is absolutely normal and usually dissipates after one-two weeks. If this sensitivity should remain or concern you at all, please give us a call.
2. As mentioned before, a normal diet should pose no problem at all. Please avoid anything that will tend to bend or twist the laminates.
3. If you are known to be a bruxer or clencher, please let us know. We will fabricate a soft nite guard for you to wear to minimize the stresses placed upon your teeth while you sleep.
Please brush and floss as you normally would to prevent oral hygiene problems. Once placed, Porcelain Laminate Veneers are typically the kindest restoration to the gum tissues that we currently have in our prosthetic armamentarium. Do not be afraid that you will damage your laminates by either flossing or brushing. Any non-abrasive tooth paste is acceptable. A good home care regimen will insure the esthetic success of your laminate restorations for years to come.
Approximately one week after the placement of your laminates you will be asked to return to the office for a treatment evaluation. This visit is extremely important. It gives us the opportunity to evaluate the placement of the laminates, the tissue response and to answer any questions you might have regarding your new smile.
We hope that your Porcelain Laminate Veneers have fulfilled all of your esthetic goals. With proper home care and scheduled evaluation visits, they can provide you with a beautiful smile for years to come. If you have any questions concerning any aspect of your dental care, please give us a call.
At your clinical examination, it was suggested that the proper means of restoring your tooth was a crown. our reasons for making that suggestion can vary from case to case. Some of the indications for a crown are:
 1. A previously filled tooth where there now exists more filling than tooth. The existing tooth structure becomes weakened and can no longer support the filling.
2. Discolorations and compromised esthetics.
3. Fractures
4. Root canal – After root canal, teeth tend to become brittle and are more apt to fracture. They, therefore, need to be protected by a crown.
5. Replacement of missing teeth requires crowning adjacent teeth in order to support the missing teeth
During your visit today, we began the fabrication of your new crown. (By the way, the word crown and cap are synonymous). I’d like to take a moment to explain what went on and what you can expect over the next several days.
We began by giving you a local anesthetic. Depending upon the type of local anesthetic we used, you can expect to be numb for one to four hours. If your anesthesia should last longer, do not be concerned. Not everyone reacts to medication in the same manner. One word of caution : While you are numb, please be careful not to bite your lip or tongue. A soft diet or no meal at all while you are numb is probably a good idea. If your child has been the patient, please watch them carefully to be sure they do not play with their tongue or lip while it is numb.
Once you were numb, we prepared your tooth in a very specific way in order to maximize the retention and esthetics of your new porcelain to metal crown. After the tooth was fully prepared, we proceeded with the impression stage. We used a thin of retraction cord which was placed around your tooth in order to get the impression material under the gum where the crown ends. Please rest assured that this small piece of cord was removed prior to the end of today’s visit.0
 Should you experience any discomfort you can take a mild analgesic (Tyleno™l, Advil™, Anacin™, etc.) as long as there is no medical contraindication based upon your medical history. Typically, you can take anything you would normally take for a headache. If the discomfort persists, please call the office.
Once the impression stage was completed , we placed a temporary (transitional ) crown (or bridge if multiple teeth were involved) on your tooth. These plastic (acrylic) restorations are placed on teeth to protect them and the gum tissues between dental visits. The temporary cementing medium used is designed to allow me, or my hygienist, to easily remove them at your next scheduled visit.
There are a couple of additional facts you should know regarding the care of your temporary crown:
1. Home care is extremely important while your temporary crown is in place. The health of your gum tissue and the success of your final treatment restoration depends upon it. PLEASE do not be afraid to clean your teeth between visits. With a minimal amount of home care, you should be able to maintain the continued health of your teeth and gum tissue during the time required to fabricate your new crown.
1. Sometimes, even with meticulous care, temporary crowns or bridges may become loose between visits. If this should occur, please place the temporary crown or bridge back on your tooth immediately. Putting a drop of Vaseline™ in the temporary crown or bridge will very often increase the retention and hold the temporary in place until you can schedule an appointment. Once again, REPLACING THE TEMPORARY CROWN IMMEDIATELY IS VERY IMPORTANT ! It only takes a short time for teeth to move if the temporary is not put back into its proper position. This could affect the final restoration significantly and may necessitate new impressions and a great deal of time. If you can not replace the temporary crown yourself, put it in a safe place and call the office. We will be happy to recement it for you at the earliest possible moment.
2. At your next visit ( in the case of a bridge, additional visits are necessary ) we will most probably place your final crown. At that time we will check your crown for accuracy, adjust for any bite discrepancies and evaluate the esthetics.
we hope that this brief instruction sheet will answer most of your questions regarding today’s visit. Following these simple guidelines will help us provide you with the finest in dental care. If you have any questions regarding this or any other procedure, please do not hesitate to call. Our goal is to make your dental experience as comfortable and rewarding as possible.
SOFT TISSUE MANAGEMENT
over the past several years we have formulated a Soft Tissue Management Program which is specifically designed to assist you in maintaining your periodontal health. The goal of this program is to control the bacteria that cause the infection. Thorough root planing ( the mechanical removal of plaque and calculus in the office ) and proper home care techniques are essential for successful periodontal therapy and good oral health.

Exactly how does Soft Tissue Management work ?
1. The Initial Phase consists of patient education in proper oral hygiene techniques. Without a strong foundation, a house can not stand for long!
The Treatment Phase involves the removal of all causative factors and may include correction of bone and gum defects by surgical or non-surgical means, correction of malocclusion ( bite ) problems, and the replacement of missing teeth in order to re-establish proper form and function.
2. The Control Phase begins immediately after the treatment phase. Once the disease process has been eliminated, it is your responsibility to seek regular preventative treatment. We are here to help at all times. You need only to ask!
Our Soft Tissue Management Program is designed to instruct our patients in the techniques necessary to maintain a proper state of periodontal health. Sometimes it will be necessary to utilize the skills of a specialist, a Periodontist. In coordination with the periodontist, your dental team will do all it can to insure your predictable periodontal health.
LIFE AFTER PERIODONTAL THERAPY
Congratulations You’ve just finished your periodontal therapy and have been told to return to our office for the completion of your treatment. But what’s in store for you now? Where do we go from here? Let me give you some idea of how we will proceed.
1. First, we will re-evaluate the condition of your gums, teeth and bone. If you have done your homework, your gum tissues should be pink and firm. Your teeth should demonstrate little or no mobility, and there should be no bleeding upon probing.
2. Prior to your periodontal therapy, we prepared all or some of your teeth in order to facilitate the access to you gums needed for periodontal therapy. The transitional restoration also served to support the weakened teeth during the surgical procedures.
3. Usually, as a result of periodontal therapy, there is a change in the position of the gum tissues. If all of the above criteria are met, we will reprepare your teeth and refit your temporary caps to the new preparations or, if you have not had temporary caps placed prior to your periodontal therapy, we will prepare your teeth for the final restoration and place temporary (transitional) caps.
By re-adapting your temporary caps to the new gum position, some , if not all, of the sensitivity you may have experienced during the healing phase of your periodontal therapy may disappear. When refitting your temporary caps, we will also attempt to close some of the enlarged spaces between your teeth which may have occurred as a result of your periodontal surgery. Some spaces, called embrasures, must be left in order to allow for proper cleaning of your new prosthesis.
 During the coming months, it is extremely important for you to continue the home care regimen prescribed for you during your periodontal therapy. Life-like porcelain restorations can only be accomplished when the gum tissues are absolutely healthy.
After relining your temporary caps, we will proceed with impressions of your teeth, trying in of the undercastings and eventually, evaluation and customizing of the actual porcelain. Once we, both you and I, are satisfied with the esthetics, function and phonetics of your new restoration, we will return the prosthesis to the laboratory for final glazing. At your next visit, we will temporarily cement your new prosthesis so that we can evaluate the form and function of the restoration during normal everyday use. After a suitable period of time, we will ” permanently ” cement your prosthesis.
A well controlled home care regimen is now your main defense against periodontal disease. Several instruction sheets are available to assist you further with the maintenance of your new prosthesis. If you need additional help with any of the home care techniques you have been instructed to use, please feel free to discuss this with either our office or the office of your periodontist. The future success of your new bridge is now in your hands. If you have any questions regarding this or any other aspect of your dental care, please let us know.
WHAT ARE THEY AND WHY DO I NEED ONE?
What is a post, what is it made of, and why do I need one? These are questions that are very often asked about a procedure that is required in order to rebuild the proper support for a cap or crown. Let me take a moment to explain….
 1. First of all, a post is a metallic structure that is placed within the body of the root of a tooth that has had previous root canal therapy.
2. It can only be placed in a tooth that has had endodontic therapy ( root canal ) since once the dentist enters the nerve, the nerve dies. Root canal therapy prevents further infection and discomfort. During root canal therapy, the space previously occupied by the nerve is filled with a sterile plastic material call gutta-percha.
3. In fabricating your post, we remove some of this plastic material making sure we leave the last two to three millimeters to seal the end of the root. This space that is fabricated is necessary in order to anchor the post within the root of the tooth.
There are different types of posts. The type that is chosen for you will depend upon a number of factors. The post can either be 1) prefabricated or 2) it can be cast at the dental laboratory. In either case, the result of anchorage for a crown is the same.
The part of the post that shows is called the core. It is upon this core that we can anchor a cap or crown. The post is cemented permanently into your tooth usually separate from the crown. The crown ( or cap ) is then ready to be placed.
Although posts are usually recommended when there is minimal support for a crown, they are not always necessary. The use of a post will be determined on an individual basis based upon support and structural requirements.
There are basically two (2) different types of denture relines.
A Hard permanent reline which can either be done here at the office with an office-cured plastic or else it can be sent to the dental laboratory and processed in a laboratory cured plastic. Due to the special processing, the laboratory reline tends to last longer. Unfortunately this will require our taking your denture from you for a few days. Please try to coordinate this with our Appointment Coordinator so that you may be inconvenienced for as few days as possible.
A Soft reline can be done here at the office or else it can be done at the laboratory in a more permanent fashion. The permanent type, lab processed, may last up to one year without having to be replaced. The office processed soft liner tends to be more fragile and will need to be removed and replaced with greater frequency.
Denture relines are necessary in order to accomplish several goals. These goals include:
Increasing retention of old, existing dentures or new dentures that, for one reason or another, have lost retention. Sometimes this may be due to recent extractions or alteration in the gum tissue due to other surgical procedures.
Repairs.
Relining of old dentures hoping to avoid the necessity of remaking them entirely.
Gum tissue conditioning which usually relies on the gentle action of soft tissue materials ( soft liners ) to allow your abused gum tissue to return to a proper state of health prior to the fabrication of new dentures.
The process of relining usually involves taking an impression in the tissue bearing surface of your existing denture ( the undersurface) and then sending it (your denture) to the laboratory. The teeth are usually left as is but the pink plastic is removed and then replaced with brand new plastic. Your denture will look just like new. I hope that this will clarify some of the issues surrounding denture relines.
Well, it’s almost over. That’s right….you’re on your way out of the office with your new cemented bridge. We really hope you’re happy with both the esthetics and the comfort of your new bridge. A lot of time and effort, on everyone’s part, went into the fabrication of your new prosthesis.
we’d like to take one more minute of your time to explain the events of the day and what you can expect in the future:
Your bridge has been checked for accuracy and fit.
We adjusted the bite prior to cementation and have evaluated, with you, your esthetic needs. However, sometimes fine tuning is necessary. If you feel there is any aspect of your bridge that needs adjustment ( i.e. the bite, esthetics, etc.) please let us know.
In order to be able to accomplish the above goals, we have cemented your new bridge with a transitional cement. One that will allow us to remove the bridge, if necessary, and make any needed adjustments. You can, however, treat your new bridge as if it is permanently cemented. Sometimes, due to the accuracy of the fit of your new bridge, it is not possible to remove a transitionally cemented bridge. Don’t be alarmed. The marginal integrity of your new bridge should prevent any problems from arising. If you feel any movement, however, it is important that you notify us immediately so that we can remedy the situation. The chances of it coming loose are minimal. Don’t be afraid to give it a good test ride.
If your new bridge is an anchor for a removable appliance, please be sure to follow our instructions as to the removal and replacement of the removable section. ( Be sure to hold the cemented bridge with your fingers when removing the removable section in order to avoid loosening of the cemented bridge.)
If your new bridge should, by chance, come loose there are a few things we would like you to do.
Most important :
1. You Must Make Sure Your New Bridge Is Never Out Of Your Mouth For Any Time. If you leave your bridge out, there may be some tooth movement which will necessitate remaking your bridge.
Call our office as soon as you realize there is a loosening of your bridge. We will be happy to schedule some time for recementation.
If you are away, try to call any dentist and ask them to recement your bridge with any temporary cement. ( i.e. Opotow Temporary Cement™, Zone™ Temporary Cement, or TempBond™ )
Care of Your New Bridge
now that you’ve received your new bridge, it is very important that you follow the hygiene instructions given to you by our hygienist. Just in case you’ve forgotten or were confused at that time, here is a list for your review. If you have any additional questions, please give us a call.

Treat your new bridge as you would treat your own teeth. It should be brushed and flossed as usual.
· If you have a tooth that was missing and it has been replaced by a tooth on your bridge, it will be necessary to thread the floss between the teeth using Floss Threaders™. If you need a demonstration on Floss Threading, please let us know.
· If we prescribed either a RotadentR and/or an InterplakR be sure to use it on the new bridge as well as on your natural teeth.
We hope you enjoy your new bridge and that it continues to serve you well for many years to come. , if you have any problems, or questions, please feel free to give us a call at any time.